Launchers
Introduction
This sixth module will cover:
- Launchers overview
- Creating launchers (ssh)
- Custom launchers
- Create custom launchers
Launchers overview
Secret Server provides the ability to launch remote desktop or SSH sessions, run applications or log into web pages directly, using the credentials from a secret. This provides users with a 'single pane of glass' where they not only have access to all credentials required for a role but also all the tools necessary to perform tasks using the credentials.
The biggest benefit of launchers aside from this efficiency gain is that because Secret Server can seamlessly inject the credentials into the session, application or website, the user never needs visibility of the username and password. This means that passwords can be hidden from users, which, in turn provides a whole range of benefits:
- Prevents users from circumnavigating audit trails or monitoring from Secret Server or other security tools
- Prevents users from sharing credentials with non-authorized parties
- Allows for highly complex passwords as users don't need to remember or input them
- Allows for regular password rotation
Out of the box, Secret Server provides the following launchers:
- Remote Desktop
- PuTTy
- Website Login
- Powershell Launcher
- SQL Server Management Studio Launcher
- Sybase isql Launcher
- z/OS Launcher
- IBM iSeries Launcher
In addition to these 'out of the box' launchers, custom launchers can be created to execute any process that can be executed from the command line. Secret Server can pass secret text fields such to seamlessly run applications with a range of command line arguments.
Note
Your trainer will now demonstrate a number of built in launchers and explain their functionality
Lab 14 - Creating a restricted RDP launcher
The built-in remote desktop launcher allows the user to enter the hostname, fully qualified domain name (FQDN) or IP address of a target machine they want to connect to. In some scenario's users may not know this information or we may only want them to able to connect to a defined list of endpoints. In this scenario a modified RDP launcher can be created with a defined list of target endpoints.
As launchers are linked to a secret template, the first step is to create a new template to contain the launcher
Note
This lab exercise should be performed from the client lab machine (Client)
-
Navigate to the Administration (double arrows) > Actions > Secret Templates
-
Click Active Directory Account
-
Click Edit
-
Click Duplicate
-
Name the new template: Active Directory Account (Restricted Launch)
-
Click Save
-
Click the Fields tab
-
Create a new Field using the Add Field button and use the following parameters:
-
Name: Allowed Servers
- Field Slug Name: allowed-servers (auto populated)
- Description: These servers are allowed to connect to
- Data Type: List (has to be list otherwise we can not select it for restriction)
- Click Save
Now we can configure a modified RDP launcher for the new template
-
Click the Mapping tab
-
In the Launchers section, click Edit next to the Launcher Name
-
Leave all basic settings as they are
-
Under Launcher Restrictions click Edit
-
Ensure the following settings are configured:
-
Restrict User Input: Checked
- Use List Fields: Allowed Servers (from the dropdown box)
- Deny List: None
-
Include machines from dependencies: Unchecked
-
Click Save
Note
This configuration means that the user will be presented with a list of endpoints to connect to that will be held in the Notes field of the secret. To test the new template and launcher we will create a secret to launch from in a few.
Creating a List to be used by the template
To be able to use a list, dropdown as defined by the template (Allowed Servers of the list type), we need to create it.
-
Navigate to Administration (double arrows) > Actions > Lists
-
Click Create List
-
Use the following parameters for the fields:
-
Name: Allowed Domain Servers - Restricted RDP Launcher
-
Description: Allowed Domain Servers - Restricted RDP Launcher
-
Click Save
-
Select the List Options menu item in the top of the screen
-
Click the Add button in the List Options and select Create Option

Note
Categories can be created as well to organize the lists (select Create Category). Example; webservers - so you can make the list available using this category. For this training we are going to use the Uncategorised category
-
In the Option Name: type DC1 and click Save
-
Repeat the above DC1 step for SSPM
-
Your List should look like below:

Create a secret using the new Secrets Template
-
Navigate to Secrets (double arrows) > IT Team > IT – Server Team
-
Click the + icon in the top right corner, to create a new secret in this folder
-
The Create New Secret Dialogue appears
-
Select Active Directory Account (Restricted Launch) as the template
-
Configure the secret with the following settings:
- Name: Server Team - Domain Admin
- Domain: Thylab
- Username: adm_serverteam1
- Password: Provided by the Trainer
- Notes: Restricted RDP Sessions
- Allowed Servers: Allowed Domain Servers - Restricted RDP Launcher (from the dropdown box)
-
Your configuration should match the image below:

-
Click Create Secret
-
To test our configuration, open the secret
-
Because of the Secret Policy configured earlier at folder level (module 4), this secret will require comment and checkout. Provide a reason like Training lab and click Check Out secret
-
Click the RDP Launcher
-
Select DC1 from the dropdown box (you will only see DC1 or SSPM) and click Launch Now
Note
If this is the first time the user has opened a Secret Server launcher they will prompted to download and install the Delinea Protocol Handler:

-
Download and install the 64bit version
-
Once installed, click the Cancel button
-
Relaunch the RDP Launcher for the DC1
-
Windows will now prompt the following warning message. Click Open RDPWinBootsrapper

-
This will open a new screen, click Yes

-
If you receive the following certificate warning in the lab, click Connect to proceed:

-
Your RDP session should now be launched and automatically logged in.
-
Close the RDP session. For now we don't need it anymore.

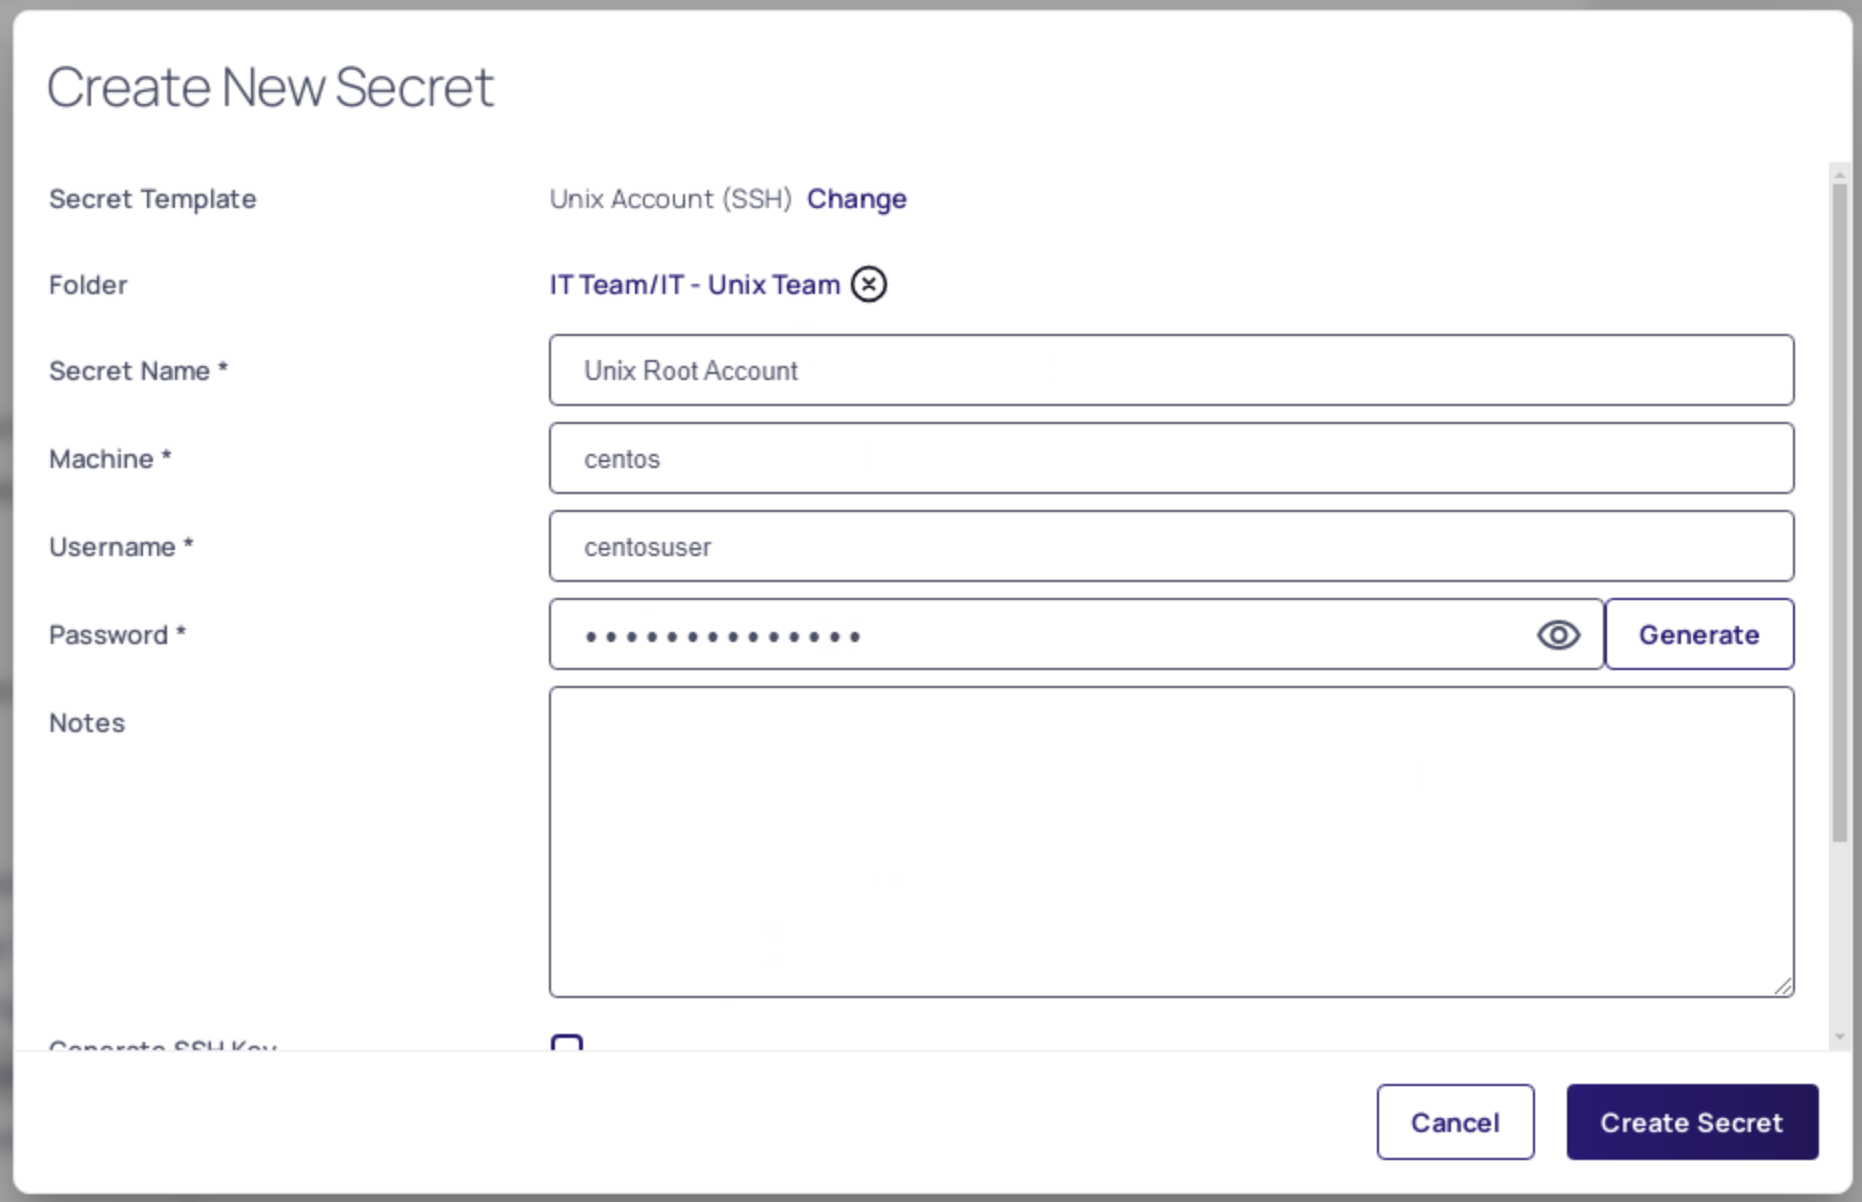
Lab 15 – Creating a Unix SSH (PuTTY) Launcher
-
Navigate to Secrets (double arrows) > IT Team > IT – Unix Team
-
Click the + icon in the top right corner, to create a new secret in this folder
-
The Create New Secret Dialogue appears
-
Select Unix Account (SSH)
-
Configure the secret with the following settings:
- Name: Unix Root Account
- Machine: Centos
- Username: centosuser
- Password: Provided by Trainer
- Notes: leave blank
-
Your configuration should match the image below:
 -
Click Create Secret
-
Launch the PuTTY Launcher
-
Windows will now prompt the following warning message. Click Open RDPWinBootsrapper
-
In the PuTTY window a warning will be shown. Click Accept

-
You should now have the centosuser logged in in the PuTTY screen.

-
Logout of the PuTTY session using CTRL+D. This will close the session.
Custom Launchers
Secret Server can configure a program to run when clicking the launcher on a secret. You can customize process launchers to work with any application that can be started by command-line and passes values to the command-line from the secret text fields. For process launchers to work, the client machine needs to have the program installed and typically needs the program folder in the PATH environment variable.
There are three types of custom launchers to choose from:
- Process: Launch a process on the client machine that connects directly to the target system from the client.
- Proxied SSH Process: Launch a process on the client machine that proxies its connection to the target system through SS.
- Batch File: Launch a batch file from the client machine.
Lab 16 – Creating a custom Launcher
The first step to configuring remote password changing is to enable the feature in configuration:
-
Navigate to the Administration (double arrows)> Actions > Secret Templates
-
Click the Launchers tab in the to of the screen, and then click Create.
-
Select Process for the Launcher Type, and then type for the Launcher Name Notepad
-
Under the WINDOWS SETTINGS
-
Process Name: C:\Windows\System32\notepad.exe
Note
If your process requires extra arguments, type them in Process Arguments. To reference a Secret field, type \$ followed by the name of the relevant Secret field. For example, /A \$FILENAME where filename is the name of a Secret field name on a Secret template that will be used with this Launcher.
-
Run Process As Secret Credentials
the process authenticates with the secret credentials (username, domain, and password) instead of the client user that is using the launcher. This can be overridden at the secret level to use a privileged account to run the process.
-
Use Operating System Shell:
Use the OS shell for the launcher. Useful for processes requiring UAC confirmation
More detailed information can be found at https://docs.delinea.com/online-help/secret-server/secret-launchers/custom-launchers/index.htm
-
-
Your Launcher should look like the following screenshot

-
Click Save
Lab 17 - Adding a custom launcher to a Secret template
-
Navigate to the Administration (double arrows)> Actions > Secret Templates
-
Select the Active Directory Account (Restricted Launch) template
-
Click the Add Mapping button
-
Select Notepad as the Mapping Type

-
Map Domain, Password, and Username to the corresponding fields in the template. These will be used if you have chosen to run the Launcher as the Secret credentials.

-
Click Save
-
There will now be two different launchers. The below screenshot should be seen in your Secret Template
